Wheel Diagnostics
Background
Rolling stock wheels take on significant load stresses over significant number of hours on the track. Their ability to successfully dissipate vibrations, shear forces, friction forces and reaction forces from the rail depend on multiple factors including the quality of shock absorption components, quality of track, wheel position on rail, loads carried and many many more factors. Poor quality rail and abnormal rail wheel interaction are major contributors to wheel damage that is visible in the form of various kinds of wear in flange, root and tread areas, externally visible wheel fractures and loss of surface material, internal fractures, and flat wheels. With the onset of one of these problems, wears and surface damages above a threshold, require wheel reprofiling to reduce the chances of wheel damaging the rail, where a wheel lathe is used to reconstruct the original desired wheel shape by taking away material and reshaping the wheel. This process reduces wheel diameter, and the wheel becomes useless once 80-100mm of material is shaved off. The accurate measurement of wheel wear and its condition is therefore of great importance at regular interval. Wheel wear and diameter measurements cannot be made by a simple visual inspection alone. Given the large number of wheels involved, it is important for this process to be automated or else a single wheel measurement with handheld tools can taken 20-30 mins and such a manual process is not scalable to regular scanning of several wheels.
RV Diagnostics
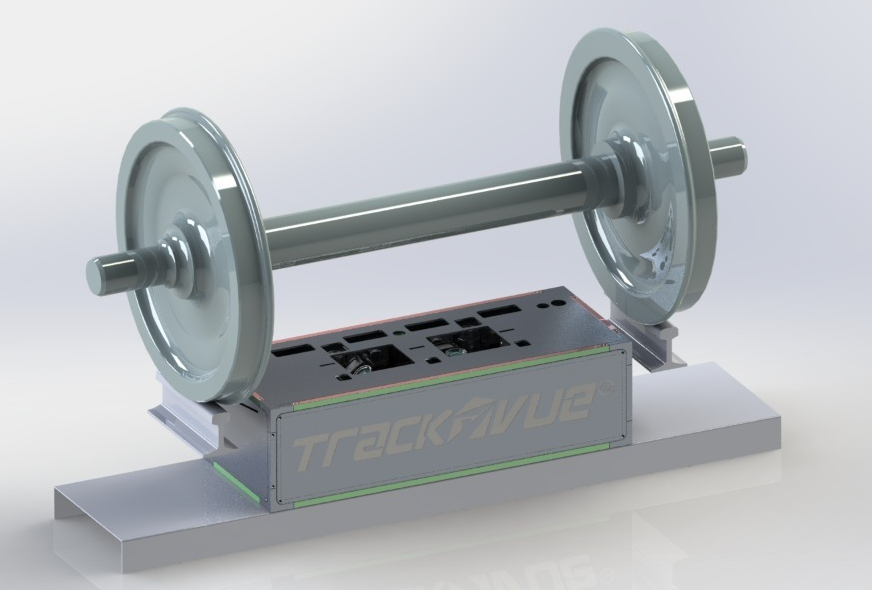
TrackVue R series equipment for undercarriage monitoring comes integrated with wheel monitoring system as shown below.

The equipment consists of laser profilers, lighting units, thermal imaging system and area scan surface imaging systems that taken measurements from an oncoming wheel at full line speeds. Often such a system may be used in workshop areas with lower train speeds. The system is triggered by a train speed measurement system that triggers all sensors at matching speeds. The data analytics is performed in real-time using a processor housed in a cabinet/hut next to the equipment. All wheel diagnostic measurements are real-time. The data is indexed for wheel ID, coach ID and train ID.
The following Table shows the various measurements made by TrackVue R series wayside solution.
| Wheel measurements | |
|---|---|
| Flange Wear | Flange wear measured as average over flange area in mm |
| Root Wear | Root wear measured as average over root area in mm |
| Tread Wear | Tread wear measured as average over tread area in mm |
| Wheel diameter | Wheel diameter in mm |
| Excessive heat detection radiating from broken and stress components | Temperature measurement on wheel surface and in critical areas |
| Surface defects | Cracks, breaks and chipped areas, measured in area milimeter square |
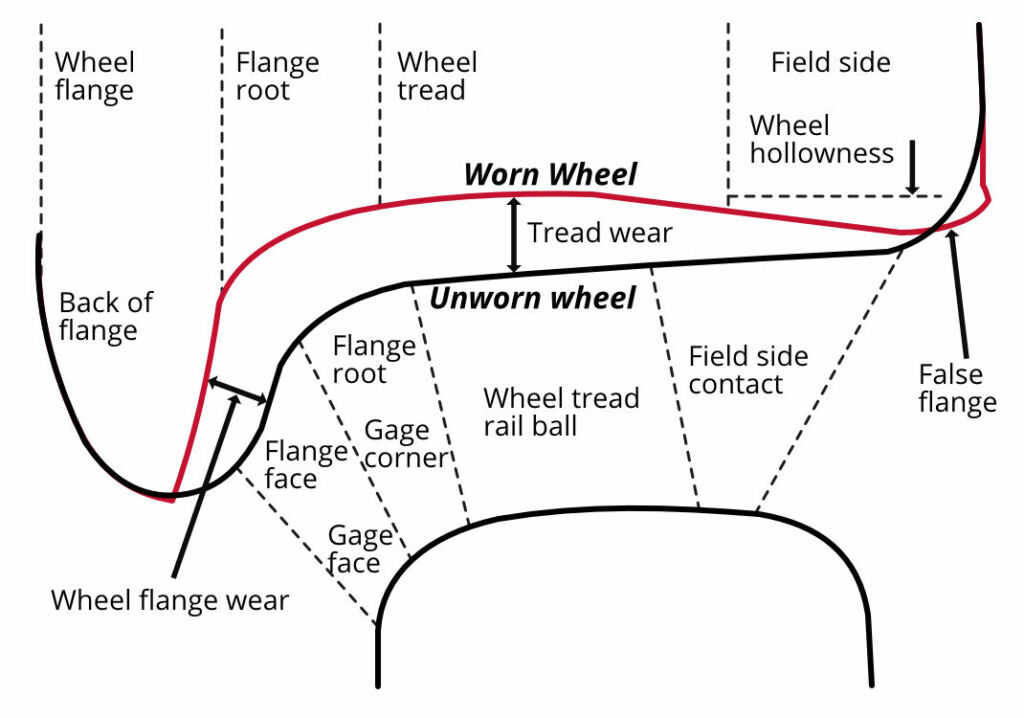
The wear measurements detailed above can be understand based on the diagram below.

Repeated wheel movement over the rail causes it to wear as shown in the figure to the left. The unworn wheel shown in black is how a new wheel profile looks like. Over time, the wheel gets worn in flange, root and tread areas as shown by the red profile. The rate of wear may be high and such cases must be detected quickly- high wheel wear also indicates high levels of rail damage. The measurement of wheel wear in millimetres is based on the data from laser profile sensors. Surface damage detection requires AI based surface image analytics software. Post-processing based analysis determines if all wheels are showing similar deterioration, and whether different bogie sides have different patterns of wear.
RV Advantage
RV Wheel diagnostics solution offers the following advantages.
- An integrated system with underframe diagnostics such that a single system can make all rolling stock wayside measurements
- System is not affected by sunlight
- System is able to operate at high train speeds
- Rugged system for outdoor use
- Fully automated, no manual intervention
- Custom solutions for indexing coach, vehicle and bogie ID are possible


